QuickBooks accounting software is often used by businesses for carrying out different accounting and bookkeeping activities. However, many students pursuing different courses based on accounting or various other finance subjects make use of this versatile software. To make it affordable for the students, Intuit offers certain student discount and offers. Thus, if you are a student and planning to purchase this software, then you should know a lot of things about QuickBooks Student Discount.
This article is going to brief you with the entire details about student discount in QuickBooks. For more information, make sure to read this post till the end or connect with our certified team professional team of QuickBooks Experts and they will guide you regarding student discount.
More About QuickBooks Student Discount & Educational Free Version
As a student, the income is zero and the expenses are high including lodging, study loans, etc. And an addition to these expenses can be a bit challenging. The QuickBooks student discount can be extremely valuable for those who might find buying QuickBooks a bit out of budget, due to high cost. Before you buy the software, it is essential to be sure which version you want for your studies. The reason behind this is that no two courses are same, this means that with the course the requirements might also vary. In case you are not sure, it is recommended to take assistance from professionals.
The students can either buy QuickBooks via online platforms or offline platforms. Buying QuickBooks desktop software from online portals might save time as well as money. Moreover, it is quite easy to use any online third-party service providers, as it would offer certain key elements that would ease everything for you.
As a student pursuing financial education, there are a few things to remember to opt for QuickBooks student discount. The students can ask their teacher or instructor about the discount. Or can also directly contact the store and get the information regarding the offers. To choose the best deal, make sure to compare the offers in hand.
Software providers that offer QuickBooks educational/student discount
Certain software providers offer software discounts and educational discounts. Thus, it is suggested to check out these software providers.
Student Discounts– This particular site usually offers discounts to students, teachers, and schools on different software for about twenty-five years. The price that they offer for QuickBooks Desktop Pro 2019 version is $199.99 and the same is for QuickBooks Desktop Premier 2019 version. Note that, it might fluctuate according to time and new releases.
JourneyEd– Another option is to check out journeyEd, which is an online store that not only sells software, but also a variety of other things. This might include, music, videos, electronic accessories, tablets, mobile devices, etc. They further offer QuickBooks training materials, along with QuickBooks software. You can avail Student discount on QuickBooks Accountant 2019 academic version. This might cost you around $99.95. This is an ideal software for students, as it offers the features required by students.
What is Intuit Education Program?
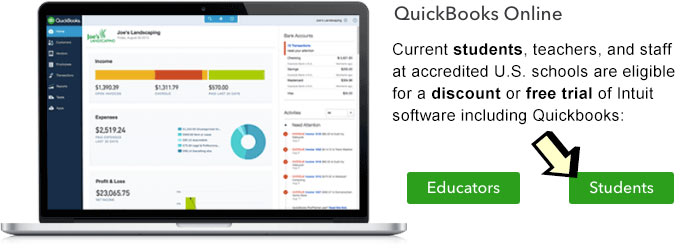
Intuit, the developer of QuickBooks offers a QuickBooks edition for all students. Students are required to register for 5 months trial version for a discount, via the education program. Moreover, an eligible student will then be permitted to download the 5 months free trial version of QuickBooks from the official portal. This program is beneficial for both students and educators for advancing their tax, accounting, and other skills. Not just that, but the Intuit education program provides free one year subscription for the following software to students and educators-
Financial literacy course called Financial Literacy Foundations
Eligibility Criteria for QuickBooks student discount?
Only the students fulfilling the below mandatory terms are eligible for this discount.
One of the most important facts is that the student must be in an accredited primary or secondary school.
Moreover, should be in public or private university or college.
School district or board of education is also important.
The student should be of accredited public or private school offering full-time instruction for students in grades k-12.
Student should be of any public or private college or university including community college, junior college, or vocational school.
Variations in prices on QuickBooks student discount
There can be certain variations in pricing of the QuickBooks student discount, due to certain reasons listed below. Thus, make sure to keep these factors in mind.
Less features: One might get same application in different prices on the same platform, due to difference in the number of features. Thus, makes sure to check the features before you make an investment.
Old version: old versions cost less in QuickBooks. You can choose the version which suits you.
Pirated software: Often people might fool students with pirated software and provide them certain discounts. To avoid this, the students are suggested to view the customer reviews along with the downloading certificates before making a decision.
Precautions for Students
It is always recommended to the students to keep a check on various other aspects and not just price. As just focusing on prices can compel them to make a wrong decision. Even though the online platforms make buying process quick and easy it is suggested to invest in the right software.
To facilitate different things for students, certain offers and coupon codes are provided to them. Various online third-party service providers offer attractive schemes to students. The students might face a variation in prices and offers, as offer policies are determined by individual third-party structure.
Students can also have to face piracy issues on some third-party providers. It is recommended to consult professionals to avoid such issues. Along with that they are recommended to examine all the key factors of purchasing the software from any third-party application source. Students might face certain variation in prices due to QuickBooks version upgrading.
Prominent Platforms for buying QuickBooks software
Often choosing the right platform might be difficult for the students to buy the software and this might end up in wrong decision making. Thus, it is suggested to keep a check on below pointers:
Microsoft products: The Microsoft’s official portal with verified certificates and prices can be an ideal platform for the students to get QuickBooks software.
Intuit’s official portal: Intuit’s official portal is another of the trusted platforms, where one can directly and easily get QuickBooks accounting software.
Apple store: Students can easily get QuickBooks software on the Apple’s official portal.
Any of the above portals can be used to buy QuickBooks with student discount. However, keeping a check on features is recommended.
How to Register for QuickBooks Desktop Student Trial?
Now that you know the necessary information, let us understand how to register for QuickBooks student trial. Well, if you’re a current student at an accredited US educational institution, you can register for a student trial of QuickBooks Desktop. You can unlock the license using the steps below:
The very first step is to navigate to Intuit Education Program Website.
After that choose register option and then go for looking for QuickBooks desktop, under the Choose your software option.
Pick students and then fill out the registration form.
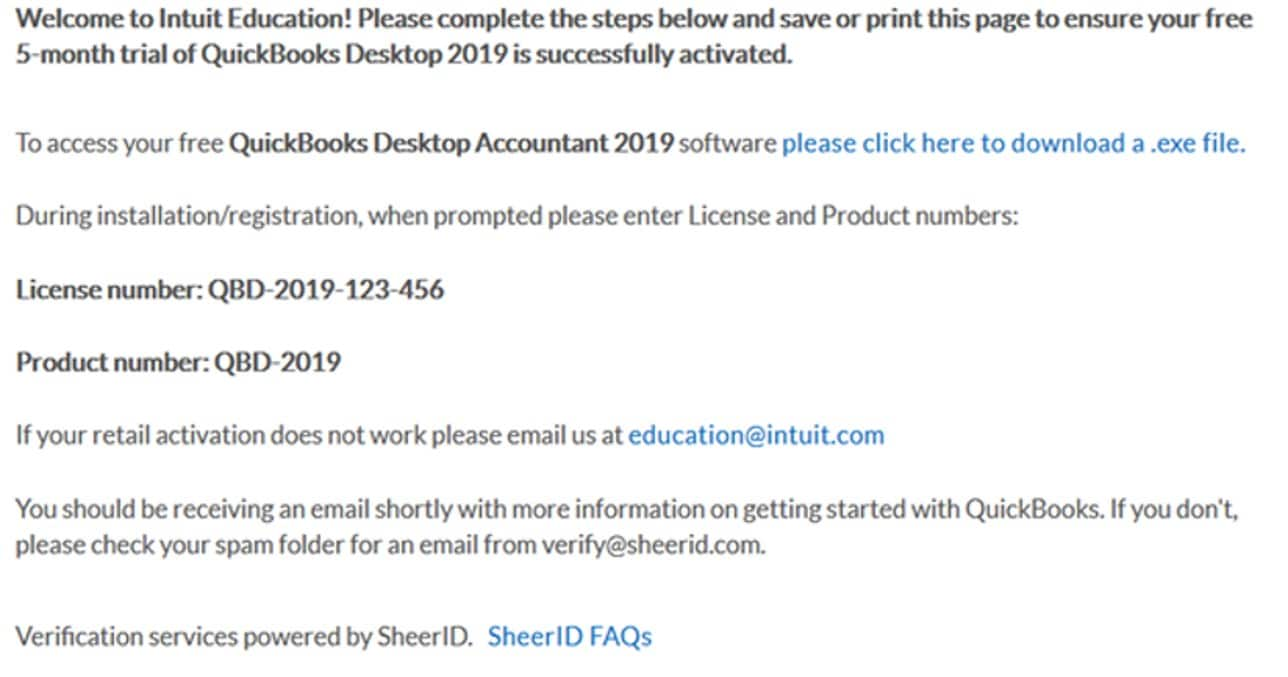
Choose verify and continue and then the welcome to Intuit Education page will display.
Note that, if the welcome page doesn’t display, then you need to continue to the verification section. Otherwise, skip to activate QuickBooks desktop student trial.
Installing steps for QuickBooks Desktop Student Trial
The very first step is to open the email you received from Intuit verification and then choose the please click here to download.exe file.
Also note that in case the email is not received, then you can contact a professional.
Also, select the download option and close any open program, along with that select the setup_QuickBooks.exe
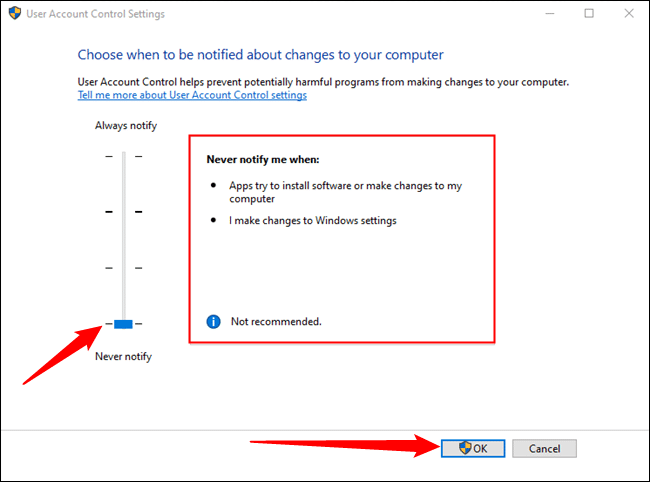
Hit yes to permit QuickBooks to make changes to the system.
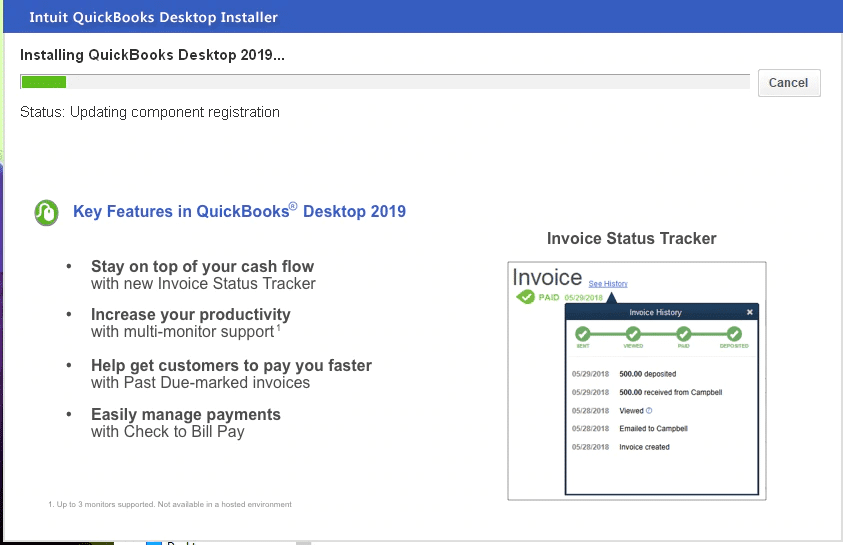
After the download is complete, hit next on the Install Shield Wizard window.
Choose next and then review the license agreement.
Go for I accept the terms of the license agreement checkbox and then hit next tab.
Enter the license and product number provided in the email and then hit next.
Opt for the express and hit next and now, choose install and select open QuickBooks.
The last step is to hit on OK button.
Steps to Activate QuickBooks Desktop Student Trial
When you open up a company file in QuickBooks for the very first time, then you might be asked to activate it. This should be done within 30 days of installation. The steps to be performed to activate it are as follows:
Start with clicking on activate
Now, create a login or use an existing Intuit login.
In case you are having an existing Intuit Account, then you need to choose create account.
After that enter all the required information for the customer account (the required fields are shown with asterisk *), and then hit next tab.
You will see a confirmation window.
Where you will need to print the page or save it a PDF file for the records.
Conclusion!
Opting for QuickBooks student discount can make accessing QuickBooks software affordable for students. We believe, that the above set of steps might help the students in understanding about student discount and accessing the software with much ease. However, in case of any query or if the user requires our assistance at some point in time, then consulting our QuickBooks tech support team at +1-844-405-0907 is recommended. We are a team of certified QuickBooks professionals who work round the clock in providing immediate support and services.
Over the past few years, QuickBooks has evolved drastically, which makes it an ideal accounting software. It offers tons of features and functionalities. Many Quicken users look for different procedures that can be performed to move their data to QuickBooks. To make it easy, we are here with this segment, where we will be sharing the complete information related to moving your Quicken data to QuickBooks. There are two simple ways to switch and move your Quicken to QuickBooks desktop. One is to convert directly to QuickBooks desktop. Whereas, the other is using the Quicken converter to upgrade the file first.
To understand the conversion process in detail, make sure to read this segment carefully. You can also get in touch with our certified QuickBooks team of professionals for any further queries at 1-844-405-0907 and they will ensure to assist you in the conversion process.
There are a few major differences between Quicken and QuickBooks, let us have a look:
Quicken software is ideal for personal use, whereas QuickBooks is better for small and mid-sized businesses. Furthermore, Quicken can be used for seamlessly handling and managing rental property and QuickBooks is all about accounting and bookkeeping. Quicken is not cloud-supported, but QuickBooks is supported on the cloud.
Important things to consider
Before you head to the process, make sure to check out the below pointers.
One of the most important points to be noted here is that the process of file conversion from Quicken to QuickBooks can’t be reversed. Thus, be sure when performing the conversion steps.
Moreover, make sure to create a backup of the quicken data that is to be converted, as you might have to access this data in Quicken software.
Also, in case you have used Quicken software on Mac, then you will have to convert Quicken Mac files into Windows files first, as only Windows files of Quicken can be converted to QuickBooks.
Steps to Convert Quicken Data into QuickBooks Desktop Data
The user can try performing the below set of steps to convert Quicken data into QuickBooks desktop.
Step 1: Make use of Quicken Converter
It is important to ensure that you are not having another version of it installed. In case you already have it installed on the system, then ascertain to uninstall Quicken Converter from the system and then download the right one below: At first, download the version of the converter tool which matches the year version of QuickBooks Desktop:
Along with creating a .QFX file, the tool also creates a .QDF file. This is the file that you want to convert, not .QFX. You need to head to the upgraded .QDF file in a folder named Q18Files or Q17Files, which is at the same location as your original Quicken file. The .QDF file might also have the same name as the original data file.
Step 3: Using the Conversion Utility to fix Quicken Data into QuickBooks Desktop
One can easily convert the Quicken file using the conversion utility in QuickBooks. The below stated steps can be of great assistance in this case.
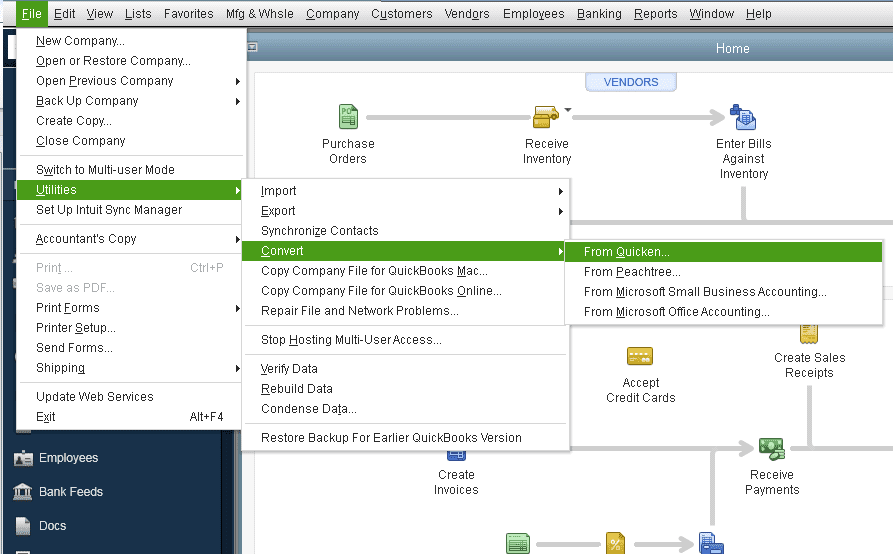
At first, head to the File option and then choose Utilities.
Go for the convert option and select Quicken.
Now, select the Quicken file [.QDF] that you wish to Convert.
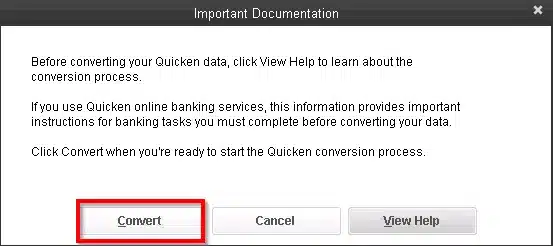
Also, click on Convert.
You will see a few steps for conversion utility all through the rest of the conversion. Make sure to perform them.
Note that you can also press the F1 key to access the help window in QuickBooks Desktop to get any further details related to the conversion utility. Or type convert from Quicken.
In case you have used the Quicken Conversion Tool you will see a folder on your desktop having the appropriate QDF file to use. The folder will be named as Q12Files or Q13Files.
Steps to Move your Quicken Data to QuickBooks Online
If you are a QuickBooks online user, then it should be noted that the steps to move data in QuickBooks online might differ from QuickBooks desktop. Thus, make sure to go through the below set of steps to successfully move the quicken data to QuickBooks online.
The very first step is to export the Quicken data to a .csv file.
Followed by performing the steps to import to QuickBooks.
Step 2: Import the .csv File into QuickBooks
After saving the crucial Quicken data in the .csv file, it is recommended to import it to QuickBooks.
This can be done by signing in to your QuickBooks account.
Now, hit on Settings.
Within settings, go for the option to Import Data.
Now, select the list type to import.
Also, click on Browse.
Identify the .csv file you created in Step 1.
Select the file and click on Open.
Also, hit the Next tab.
The Map data page will show up on your screen.
Now, click on the dropdown menus for mapping the fields.
After that click on Next.
Double-check if all the entries are correct.
Click on the Import option for importing the file to QuickBooks Desktop.
Step 3: Connect to your financial institution
Here you are supposed to connect to your bank account via QuickBooks to group your transaction-related data.
To Conclude!
QuickBooks has proved itself in the past few years, and gradually almost every business is moving to QuickBooks, in order to manage the accounting and daily financial activities smoothly. Thus, reading the above set of steps and implementing them might help you in moving from Quicken to QuickBooks. However, if you are stuck at any point in time, or if you require any sort of assistance, then, in that case, consulting our QuickBooks tech support team at +1-844-405-0907 is recommended. We are a team of certified QuickBooks professionals who work round the clock in providing immediate support services.
Have you ever been stuck while scheduling automated Backups in QuickBooks? If so, then your search ends up right here. For all of you, we have compiled a useful write up on QuickBooks Scheduled Backups not working issue and the essential steps that we can perform to tackle out this error conveniently. To prevent the data from an unexpected loss one of the most successful and effortless method used by users is by scheduling an automatic backup of the Data. It helps them to schedule the backup of company file related data on its own by a particular Date and Time decided by them only. However, at times users are not able to use this function because of the error message:
‘QuickBooks scheduled backup not working’ issue
Where the name only describes that here QuickBooks fails to create backups of company file and related data that are scheduled, thereby creating risk for the security of user’s data.
Here, in this article, at first, we will talk about what are the main causes of QuickBooks scheduled Backup not working issue and then we will discuss about the different methods to resolve this issue. For any further technical assistance, you can reach out to our QuickBooks ProAdvisor, by calling us on toll free number +1-844-405-0907 and receive instant and effective troubleshooting guidance from them without stressing much.
In simple words, QuickBooks Online Backup is a service designed in the QB Online version that enables the application to store all the data files and essential folders on a cloud server. Online backing up of data in the cloud server facilitates the data to stay safe in the proper space and can be restored whenever necessary. It also helps in preventing troubles like the sudden loss of data or corruption, as files that are authentic are stored safely in a precise location. All desktop versions of QuickBooks, be it QuickBooks Pro, Premier or Enterprise also have the feature to schedule backups of the company file. And user can schedule backups according to their choice and preferences. It will store their data in a secure location that user can choose itself, either cloud or local storage.
What do you understand by “QuickBooks Online Backup Scheduled are not Working” Error?
“QuickBooks Online Scheduled backup are not working error” message appears when the backup feature is not responding as expected. In other words, we can say that either the automatic backups are failed or they get interrupted in between. This accidental loss of data caused by this error may cause severe problems in the near future. And there could be several reasons that can bring the QuickBooks desktop cloud backup to come to a halt. So, it is very important to know them at one’s earliest convenience to implement adequate troubleshooting methods.
Possible Reasons behind the error: “Scheduled Backups are not working in QuickBooks”
There could be many minor reasons that can instigate the ‘QuickBooks scheduled Backup Not working’ Issue. Some of the following reasons are:
Another probable reason could be running a non-identical version of Windows in QuickBooks like using Windows 10 whereas QuickBooks is configured for Windows XP or any other versions of Windows.
Unusual set up of scheduled Backups in QuickBooks can also cause this kind of error.
Any kind of damage in the data of company file in QuickBooks is also responsible for the errors in scheduling automatic backups in QuickBooks.
Having an. ADR extension in the file name can also interrupt the backup procedure in QuickBooks online backup service.
If the size of the company file is more than the standard, i.e., 3 GB, you are in for errors.
Saving the backup to an external flash or hard drive can also trigger problems in QuickBooks auto backup. It can be because the external drive doesn’t have enough space or is virus-prone or corrupt in general.
Compatibility issues between the windows operations system and QuickBooks can cause problems in the backup.
QuickBooks may not have the required access permissions to create backups in the designated drive or folder.
Improper backup configurations can lead to problems in QuickBooks desktop online backup.
The QB Desktop application might be damage or corrupt due to various reasons like viruses or improper installation.
Windows insufficient permissions can also lead to this issue.
Effective Solutions to Quick fix the error: “Scheduled Backups are not working in QuickBooks”
If you want to tackle out this error without any inconvenience then we would recommend you to perform these following troubleshooting strategies:
I: Download and Update QuickBooks Desktop to the latest release.
Follow the below instructions and quickly get the latest updates of your QuickBooks Desktop application:
At first download and run the QuickBooks application software.
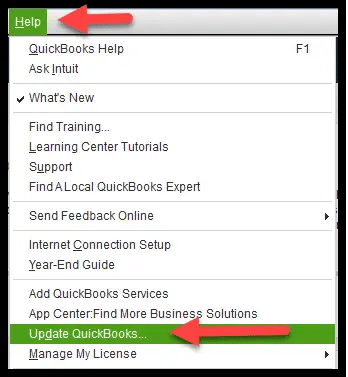
Go to the Help menu and select Update QuickBooks Desktop in order to update it.
Now go to the Update Now tab and choose Reset Update box for clearing the past updates.
Hit on the Get Updates to begin the downloading and the download process will start.
Restart the QuickBooks software after the download process is over.
Hit the Yes button when asked to install the new update that appears on your screen.
II: Run QuickBooks Verify and Rebuild Data Utility
Rebuild Data Utility Tool is an inbuilt tool of QuickBooks that is used to verify the integrity of company files and data that are saved in the QuickBooks. This tool has the biggest advantage that while running this tool if any destruction occurs to the application, it automatically repairs that destruction.
Steps to run QuickBooks Verify and Rebuild Data Utility to resolve Scheduled Backups are not working in QuickBooks.
Begin the procedure by Opening with QuickBooks Desktop, now under the file menu, Choose Utilities option to resolve the QuickBooks scheduled Backup error.
Choose to click the verify Data option from the drop-down list.
Next, move ahead to select this option QuickBooks scan all the company files and data, and try to fetch out damage.
Once the scanning is complete, you may see a dialogue box will display stating that “Your Data has Lost Integrity” then close this message, click on the file tab again.
Again, move forward to select Utilities and this time, under the utility section, Select Rebuild Data tool.
Now click on the backup company data popup window that appears to get a backup of your data on your desktop, Hit the OK tab.
Now, the Allow the Rebuild Data Utility tool to repair your company file but for this you may have to wait for a while where it will repair all the damage in your company file. The QuickBooks application may seem to be stuck, but if you are able to move your cursor on the screen, then this tool is working.
Finally Hit the OK button once the process is complete.
If the “Rebuild has completed” message appears on the screen then Hit the OK tab and once again try to schedule the automatic backups.
III: Checking out the Scheduled Backup Settings in QuickBooks
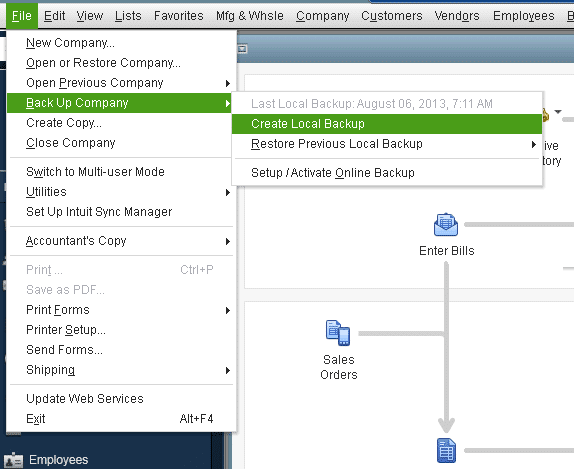
At first open the QuickBooks and Choose File menu, Now Select Save Copy or Backup windows to open the workflow.
Go for the Backup option and hit the NEXT button.
If you haven’t set up the backup defaults, then click on Options to set the backup defaults (where you want to keep your local backup), Hit on the Next tab.
After that choose Change Location option or Use this location (as per your choice)
Click on the Next tab.
Then hit the Save it now and schedule future backups options or only schedule future backups. And again, click on Next tab.
Now select ‘Save backup copy automatically when I close my company file every (number) times’ box.
At last fill the number in the field provided and click Finish button.
IV: Run QuickBooks in Compatibility Mode for Your Version of Windows
Begin the process by Opening the system and right-click on the QuickBooks icon on the desktop and then click on properties tab.
Look for the Compatibility tab and check and tick mark the “Run this program in compatibility mode” option.
Now select your Windows version by clicking on the drop-down list.
Simply, click on Apply and then hit the OK tab.
Now, check if the problem still persists, hopefully, it’s not there.
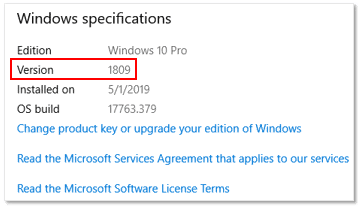
IMPORTANT NOTE: Before running QuickBooks in Compatibility mode first you need to check the version of windows. So, to check the version of your Windows, press Windows + R at the same time on your keyboard, type Winver command in the Run box, and press Enter. This will show a popup with your windows version-related information. With the help of this process, it will make QuickBooks suitable to run for your Windows. Even After performing all the above solutions, if in case QuickBooks automatic backup is still not working then you would want to reinstall the QuickBooks Desktop application using the QuickBooks Clean Install Tool.
Winding Up!
So, now we hope that you got to know what to do whenever the ‘QuickBooks Scheduled Backup not working’ issue occurs on your system. Also, all the above-mentioned solutions are quite informative and this article has a complete guide for resolving this error. But if in case your issue is still not resolved after following the above solutions, we advise you to reach out to an expert at QuickBooks error support center by simply dialing our helpline Number +1-844-405-0907 and they can provide you further assistance.
Technical glitches in QuickBooks are pretty common. However, every error can be fixed using some unique set of steps. Today, in this segment, we are going to discuss QuickBooks unexpected error 5. This glitch is often seen when the QuickBooks database service user is restricted to access the file location. It appears on the screen with a warning message QBW Error: An Unexpected Error Occurs. You can experience such issues due to invalid entries in the Windows registry or if the system is not configured accordingly.
There can be a bunch of factors triggering such errors, to learn what those are, along with the set of steps that can be performed to eliminate them, all you need to read this segment with much care. Or you can also get in touch with our QuickBooks Desktop tech support professionals at +1-844-405-0907 and take their assistance in eliminating the issue from its root cause.
What triggers QuickBooks Error Code 5?
This error can be experienced due to the below set of factors:
The below process requires you to press the Windows tab and R tab to open run box and look for appwiz.cpl
And then, locate and double-click on QuickBooks to remove it and all of its features from the device.
After that, return to the QuickBooks website to download the desktop application again.
Make sure you are downloading the correct version of the application and perform the steps to reinstall the application.
Conclusion!
Towards the end of this segment, it is believed that the information shared in above might be of great assistance in eliminating the issue from its root cause. However, if you continue to face the unexpected error, then in that scenario consulting our QuickBooks tech support team at +1-844-405-0907 is recommended. We are a team of certified QuickBooks professionals who work round the clock in providing immediate support and assistance. Feel free to share your queries and requirements with our team.
Converting from any accounting software to QuickBooks requires a conversion tool. Intuit, the developer of QuickBooks offers a conversion tool that helps in converting the company file from another program. This tool usually permits the users to convert the company from a plethora of different programs. Conversion of QuickBooks 2017 to QuickBooks desktop premier to QuickBooks desktop premier 2018 or Pro 2018 or QuickBooks desktop enterprise solutions 18.0 is possible using this tool. The tool can help you in completing the process without any sort of data security compromise.
To learn more about the conversion tool and the process to use it, make sure to scroll through this segment carefully. For more details, you can also connect with our QuickBooks tech support team at +1-844-405-0907 and they will help you with any further assistance.
As we mentioned earlier, Intuit provides certain tools to users to make the work process easier. One such tool is the QuickBooks data conversion tool. This tool allows you to convert the company file from a variety of different programs. Using this tool, you can do things like conversion of QuickBooks 2017 to QuickBooks desktop premier 2018 or Pro 2018 or QuickBooks desktop enterprise solutions 18.0. You can also conversion a bunch of other information like:
Account, Employee, Item, Customer, and vendor lists
Individual employee wage or deduction information.
Closed or partially closed Sales orders, Purchase orders, and Estimates.
System Requirements for the QuickBooks conversion tool
Keeping your system ready for the tool is essential to ensure that your tool works smoothly with your system. Here are a few system requirements, you need to check upon.
Operating system: Windows 10, Windows 8.1, Windows 8
Processor: 500 MHz Intel Pentium II
Memory: 512 MB
Hard drive: 2.5 GB free space.
Microsoft .NET Framework: Version 2.0 is the least.
QuickBooks Desktop: Pro, Premier, or Enterprise 2018.
Sage 50: Version 2013 and above.
OS should be either Windows 7, 8, or 10, or windows vista, or windows XP.
Make sure to install .NET 2.0 framework.
QuickBooks desktop should be registered and installed properly.
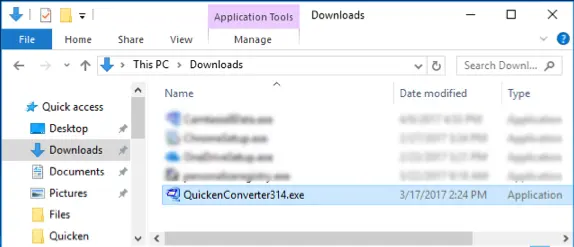
Search for and open the folder having the downloaded file.
After that, right-click on the QuickBooks conversion tool icon and choose properties.
Under the compatibility mode, choose the checkbox for run this program compatibility, and then choose from the dropdown the window operating system being used.
Click on ok tab.
The last step is to right-click the file i.e. QuickBooks ConversionToolSetup.exe and also select run as admin.
What are the limitations of the QuickBooks conversion tool?
Even though the tool is full of features, there are certain limitations as well that you must be well versed with. These limitations are associated with importing data, transactions, and account balances from other financial software into QuickBooks. This would help in converting employee list information which includes the social security number, as well as payroll general ledger account balance information. Note that, there is certain payroll information that can’t be transferred using the tool. This includes paycheck, employee year-to-date information, payroll item, individual employee wage, etc. Along with that, job costing, fixed asset items work tickets, and then close or partially closed sales orders, estimates, and purchase orders might not be converted with the help of a conversion tool.
Now, look for the folder, where the QuickBooks file is to be kept.
After that, click on next.
In the new window, verify the accuracy of the information.
After that, click on the convert file option.
The process might take some time.
Thus, wait for the message to appear prompting done.
Now, open the QuickBooks file and check for the process completion.
Step 4: Review the conversion
Once the tool performs the necessary steps, it is important to review the data and check if the transfer was a success. We can do this using the steps below:
At first, open the windows start menu.
Search for and open the file explorer.
You are now required to head to the C:\USERS[Your Windows User Name]\My Documents\Intuit\QuickBooks.
The last step here is to review the failed transaction log in the folder and check if the data is transferred or not.
Note that, you can only convert the versions of Sage 50 and QuickBooks desktop from the same region.
Steps to Convert from Quicken to QuickBooks Desktop
We can use the Conversion tool to convert from Quicken to QuickBooks easily. You can convert the Quicken 2011 or the earlier versions to QuickBooks using the steps below:
The very first step is to download the QuickBooks conversion tool using the steps listed above.
In case you are converting to QuickBooks of the same year from Quicken of the same year, then the tool is not needed.
Now, launch the Quicken converter and then click on next tab.
The User than needs to accept the terms in the license agreement.
Also, click on next and install options.
Choose launch quicken converter and click on finish tab.
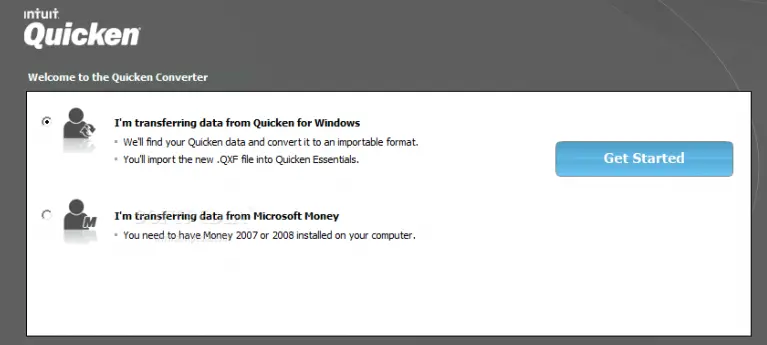
The user is now recommended to choose I am transferring data from Quicken to windows option and then go for the get started option.
After that, click on open a data file located on this system option.
Followed by, browsing the file by clicking on the select file tab.
Click on the convert and OK tabs.
And now, click on save to save the updated quicken file and also select the exit option.
The Quicken file will not be upgraded.
The user will then have to launch the QuickBooks desktop.
And move to the file and utilities tab. You will also have to opt for the convert and from Quicken. option.
Perform the onscreen steps to conclude the process.
To Conclude!
We end this segment right here with the hope that the information shared in above might be of some assistance in making the most of the conversion tool. However, if you still have some queries unanswered, or if you require any sort of technical assistance, then in that scenario, consulting with our tech personnel at +1-844-405-0907 is suggested. We are a team of certified professionals, who work round the clock in providing assistance for all sorts of the software-related queries. Thus, feel free to connect with and share your queries and requirements.