Everything you Should know about Print 1096 and 1096 forms in QuickBooks
Professionals like doctors, lawyers, accountants, contractors, etc., who work independently, for a business or firm where they offer their services to the public are generally independent contractors. Though, in some cases, can also be employees. To make a long story short, an individual is called an independent contractor if the payer can control or direct only the outcome of the work and not what how the work is done. This article is created to assist you to set up a 1099 Independent Contractor vendor in QuickBooks Desktop.
Also Read: How to Troubleshooting Basic with QuickBooks for Mac?
Process to Print 1099 & 1096 forms in QuickBooks
Prior to establishing a 1099 vendor in QuickBooks Desktop, examine the IRS standards initially to recognize if your vendor falls under the group of an Independent Contractor. Below we have given few important points to start setting up your Independent Contractors:
Set up an Autonomous contractor
Note: We recommend you to check the IRS guidelines before performing this step to determine if your vendor falls under the Independent Contractors’ category.
- Open QuickBooks Desktop, go to Edit tab and select Preferences.
- Select 1099 for Tax.
- Choose company preferences tab.
- Click Yes when “Do you file 1099-misc forms?” option.
- Select ok in order to save the settings.
Add a vendor in QuickBooks
- Open Vendors and select Vendor Center.
- Click on the drop-down option and choose New Vendor.
- Type a supplier name of your choice to be listed in the Vendor Name field. This will be found under Vendors listing.
- Fill details in the tabs.
- Supplier can be modified to include additional details.
- Select OK.
Set up Vendors to get 1099-MISC in QuickBooks
- Open Vendors and select Vendor Center.
- Find supplier’s name and do a right click.
- Tap on Edit Vendor.
- Go to Address info tab and verify the Details.
Set up an expense account for vendor payments.
To set up an expense account in QuickBooks Desktop:
- Firstly, you need to choose Edit and then choose Preferences.
- Next, Select Tax: 1099 On the left.
- Then Click on the Company Preferences tab.
- Next to Do you file 1099-MISC forms? click to select Yes on top.
- After that, If you intend to map your account to boxes on Form 1099-MISC, you need to click on this link.
- The QuickBooks 1099 Wizard will certainly open up.
- The QuickBooks Desktop accounts to track payments to your 1099 vendors will be listed.
- In the Apply payments to this 1099 box column, click the drop-down menu as well as select the ideal 1099-MISC box.
- Most Vendors get paid with Box 7: Non-employment Compensation, although you will certainly intend to ask a tax professional first before choosing which box to utilize.
Please note: The only supported boxes QuickBooks Desktop support remain in this checklist.
- You need to Select an 1099-MISC box for each account noted or choose Omit these payments from 1099.
- Click Save & Close once the accounts have actually been mapped.
Important Points to Remember:
- Put appropriate state abbreviation and postcode in the address field.
- In case of an individual vendor, the supplier’s name must appear in first, middle and family name boxes.
- Leave the Company Name box empty if you know the business name but not the individual’s name.
- Choose the Tax Setup button.
- Select the eligible Vendor for 1099
- Type in the tax obligation id number of the supplier in the Vendor Tax ID Field and click OK.
- Perform the steps (2 to 6) for every 1099-eligible vendor.
Understand how company and vendor names appear on the 1099-Misc form
QuickBooks features three name fields in QuickBooks Desktop:
- Vendor/Contractor Name
- Company Name
- Full Name
Possible Scenarios Based on What’s Entered in 1099-MISC forms
Here are the probable scenes based on details entered in these fields:
- Vendor Name as well as Company Name have values in QB Desktop
- Outcome: 1099-MISC Form will have both the Vendor Name and Company Name on it.
- Blank Vendor Name and a value for the Company Name in QuickBooks Desktop
- Outcome: You can’ leave the Vendor Name blank. You have, however, an option to specify the Vendor/Contractor Name and leave the Full Name field blank. In a case like that, just the Company Name will show up on the 1099-MISC Form.
- Values for Vendor Name and blank Company Name in QuickBooks Desktop
- Outcome: The 1099-MISC Form will only have the Vendor Name.
- Different values for Vendor Name, Company Name and Full Name fields in QuickBooks Desktop
- Outcome: Just the Full Name and Company Name will display on the 1099-MISC Form.
NOTE: Vendor Name usually auto-populates with the details provided in the Full Name fields, unless you (or someone) changed the Vendor Name manually.
You may also read: How to Setup System Requirement for QuickBooks Desktop Mac 2019?
Steps to Print the form 1099/1096
Forms can only be printed in single-user mode, and you must have pre-printed 1099 and 1096 forms to perform this. You can also choose to e-file your 1099 forms to the IRS.
- Verify your 1099 details through QB Desktop 1099 wizard.
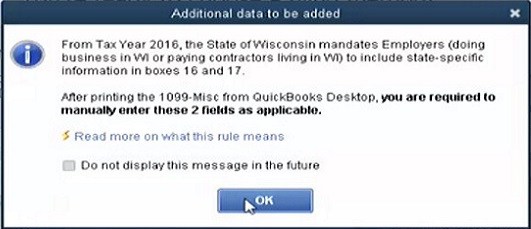
- In the wizard, at step 6, choose a filing method and click on Print 1099s. Read the message and click OK to get the print.
- Select the range (of date) the 1099s were paid from and click OK.

- Select the form 1099(s) you wish to print and click the Print button.
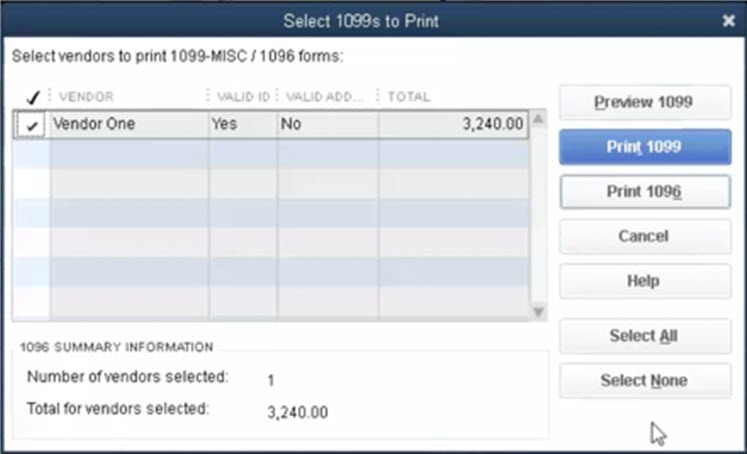
- You can click Preview 1099 and check the alignment. To align the form:
- Firstly, Click File on the top menu bar
- Then Click on Printer Setup.
- Now close 1099s/1096 from the list in Form Name
- Click the Align button and adjust alignment as needed.
- Click OK, and then OK again to save your changes.
- Choose 1099(s) you wish to print and click Print 1099(s).
- Click the Print 1096 button to print 1096.
Read Also: How to Fix QuickBooks Mac Error Troubleshooting & Help?
Few important tips to use while printing 1099/1096
- Print separate copies than all at one with a page-oriented printer.
- You must not collect your pre-printed forms prior to placing them in your printer. You can first load all the Copy 1 forms. Once all the Copy 1 forms are printed for each vendor, then load and get prints of the Copy 2 forms.
- Copy A (non-perforated) is for the IRS and copy B (perforated) is for the vendors/suppliers. A page can only print 2 vendors per page.
- Alignment will prompt you to select -1 in order to bring the print down or +1 to bring that up.
- This selection can lower or enhance the print 1/100th of an inch.
We hope that this article provides you will all the details to be able to print QuickBooks desktop forms 1099/1096. In case you need any further assistance, you can call us at 1-844-405-0907. We are available 24×7 and offer our QB users with best in class QuickBooks support. Contact us today..!
FAQ (Frequently Asked Questions)
Question: Is there a way to file 1099/1096 forms electronically from QuickBooks Desktop?
Ans. Yes. You may use QuickBooks 1099 E-File Service to file your 1099/1096 forms electronically from QuickBooks Desktop.
Question: Does Assisted Payroll support filing of 1099/1096 forms with IRS?
Ans. No, Assisted Payroll does not support filing of 1099/106 forms. The fastest way to file your 1099/1096 forms from QuickBooks Desktop is by using our 1099 E-File Service.
Question: Does Form 1096 prints with 1099-PATR box checked instead of 1099-MISC?
Ans.
Description: When printing type 1096, the checkbox in the bottom of the form for 1099-PATR is examined as opposed to box for 1099-MISC.
This problem has actually been fixed with a program upgrade released around January 26th 2015. Please download as well as install the most up to date QuickBooks Desktop updates:
Here’s How:
- Go to to the ‘Help menu‘ and click Update QuickBooks.
- After then Click the ‘Update Now‘ tab.
- Now make sure that ‘Critical Fixes‘ is selected at the end of the listing of updates and click ‘Get Updates‘.
- As soon as the updates have actually been downloaded, restart QuickBooks Desktop and attempt to print a 1096 type again.
You May Also Like
How to turn On Advanced Inventory in QuickBooks Enterprise?
Important Tips for Reconciliation in QuickBooks
Install, Update, and Set up the QuickBooks Database Server Manager