|
QuickBooks is a leading accounting software, trusted by millions of small and medium-sized businesses. It’s a multi-tasking software that helps business persons to generate invoices, accept payments, pay employees, track inventories, etc. Though QuickBooks is an innovative software, it does face errors at times. Errors may appear while installing it or running it on your system. Some issues also arise while updating and upgrading the software, for example, QuickBooks Error 15101. In this blog post we have discussed about QuickBooks Error Code 15101 – Know when does this error code occurs and how you can fix this error.
When Does QuickBooks Error 15101 Occurs?
This error happens when you use QuickBooks Premier Software. If you regularly use QuickBooks payroll subscription, then you can connect to the internet through it and have access to secure websites to work. Talking QuickBooks payroll error 15101, it’s a run-time error which should be fixed immediately, or it may cause further issues. You can fix this error immediately with the help of QuickBooks Payroll support team.
What are the signs of QuickBooks error code 15101?
The following are the signs of the error code making it easy for the user to spot the error.
- In case the windows crash when working
- Another sign can be if the software doesn’t respond
- The user can also spot the issue easily if the system or the software is responding sluggishly to the mouse and keyboard inputs
Read Also: How to Fix QuickBooks error code 15104?
Fixation of QuickBooks Payroll Error Code 15101
You can follow the below-mentioned solutions if you receive QuickBooks Error 15101:
Solution 1: Install Digital Signature Certificate
- Download and Install digital signature certificate in your system.
- Search and find ‘QBW32.exe file‘ (It should be located in ‘C:\Program File\Intuit\QuickBooks)’
- Windows 7 users can go to ‘Windows Search‘ option.
- Click ‘More Results‘ in windows search.
- On next screen, click on ‘Computer‘ icon.
- In search box, type ‘QBW32.EXE‘ that has a type of application.
- Do a right click on ‘QBW32.exe‘ and select ‘Properties‘.
- Select ‘Digital Signature‘ tab and make sure you have selected Intuit Inc. from the signature list.
- Now click on ‘Details‘.
- Choose ‘View certificate‘ in digital signature details window.

- Go to ‘Certificate Window‘ and choose ‘Install Certificate‘.
- Click ‘Next‘ until you get a dialog box with ‘Finish‘ option.
- Hit a click on ‘Finish‘ option.
- Restart your computer.
- Open QuickBooks.
- Download the update one again.
See Also: How to Fix QuickBooks Error Code 15107?
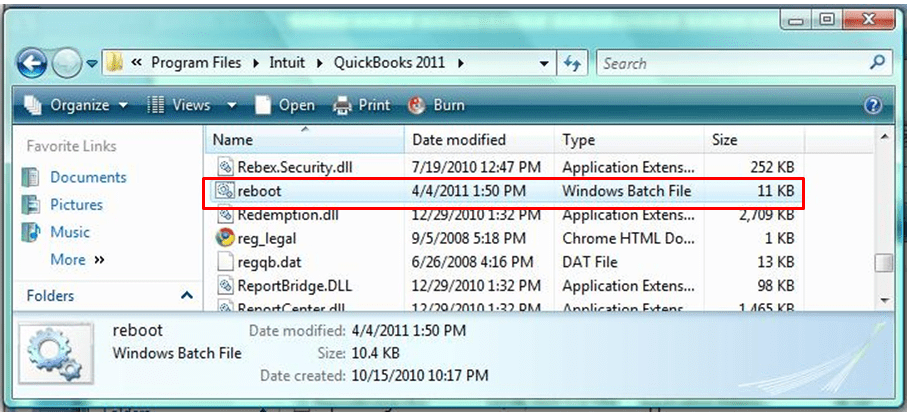
Solution 2: Run reboot.bat files
Running reboot.bat files may enable you to re-register .DLL, .OCX and other product files in Windows.
- Close QuickBooks application.
- Right-click on QuickBooks icon and select Properties.
- Go to Shortcut tab and click on Open File Location.
- Find a reboot.bat or reboot file from the list on your screen.
- Right-click on reboot.bat (file) and select Run as administrator.
- Click Yes to get user account permission. Now a CMD (black) window will open and display a different file scrolling.
- Restart your computer.
- Open QuickBooks Desktop and click Install to download the latest updates, if any.
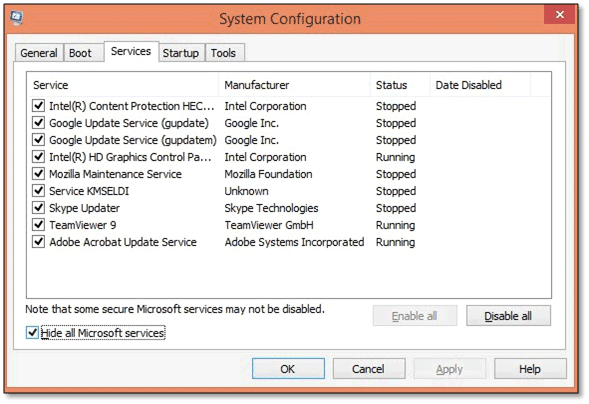
Solution 3: Check Internet Explorer Settings
- Open Run window by pressing the Windows and R keys on the keyboard and type INETCPL.CPL on the open box and click OK.
- Select the General tab, click on Delete and then select Temporary Internet Files and Website Files.
- Then Delete again.
- Select the Connections tab and click on LAN settings.
- Detect settings and press OK.
- Next, go to the Advanced tab, scroll down to the security section and check if TLS 1.2 is checked and TLS 1.0 and TLS 1.1 unchecked.

You may also like: How to Resolve QuickBooks Error Code 6154?
Solution 4: Uninstall and Reinstall QuickBooks Desktop
Uninstall and reinstall QuickBooks using Clean Install tool.
- The very first step is to close the QuickBooks software.
- After that right-click the QuickBooks icon
- Go for the Properties tab
- The next step is to head to the Shortcut tab and hit on Open file location.
- Now, look for the Reboot.bat from the list on the screen.
- After that right-click the Reboot.bat file
- And hit the Run as admin.
- The user should then click on the Yes tab to get User account permission.
- And after this a CMD window will open and display a different file scrolling.
- The next step is to restart the system.
- And the user should open QuickBooks desktop
- Once done with that click on the Install option to download the latest updates, if any.
- After this Rename the installation folder afterward.
- And download and run clean installation tool or rename the folders manually.
- End the process by reinstalling QuickBooks software.
Solution 5: Safe mode
Important Note: When you remain in a safe mode, Windows operating systems has the most lowest number of drivers should needed to work.
If you are making use of Windows and also attached to the Internet with a high-speed link. You could be able to restart the system in safe mode setting with networking mode.

Restart the system after that
- After selecting ‘Safe Mode with Networking‘, select which operating system you want to use to restart.
- Click on the ‘Enter‘ key.
- At the immediate to select a ‘login‘, Now select the ‘System Administrator‘, which will give you access to all computer programs.
- Now Enter the ‘Administrator password‘.
- After that Select the ‘Yes‘ option, when specific to work in a safe mode setting.
- Next, Open your QuickBooks and also attempt the task once more that was failed.
- Finally, Restart the system after that.
- Done..!
Solution 6: Configure the Firewall settings
- The user is supposed to hover over the Start menu
- After that open Windows Firewall by searching for ‘Firewall‘ in the search box.
- And move to Advanced Options.
- The next step is to right-click Inbound Rules & choose a New Rule.
- The user should then move to Program option, followed by hitting Next.
- Now, click on Browse and choose This Program Path.
- The next step is to look for the QuickBooks executable files and choose them
- After that click on next tab
- Permit the connection and again hit Next.
- After that double-check that all profiles are marked.
- And click on Next tab
- Create a rule and subsequently name it. For example : “QBFirewallException(name.exe).”
- Open QuickBooks and check if the error is fixed or not
See Also: How to Fix QuickBooks Error Code 15104?
Winding Up
We hope that the solution in this article should help you in fixing the QuickBooks Error code 15101. In case you still have this error you can contact QuickBooks Customer Support. Reach us at our toll free +1-844-405-0907. Our experts are available 24*7 and we have a reputation of offering quick and precise solutions.
You might also like:
How to Fix QuickBooks error code 15102?
How to Resolve Email Issues in QuickBooks Desktop?
Steps to Change Employee Payroll Information in QuickBooks Desktop
Some Common FAQs for QuickBooks Error 15101:
QuickBooks error 15101 is an update error that prevents you from downloading the latest updates for your QuickBooks software. It can cause your software to malfunction and affect the accuracy of your financial data.
Answer: QuickBooks error 15101 can occur due to various reasons such as firewall issues, internet connectivity problems, or outdated software. To prevent it from occurring in the future, ensure that your firewall is not blocking QuickBooks, your internet connection is stable, and you regularly update your QuickBooks software.
Answer: To fix QuickBooks error 15101 on your own, you can try resetting your internet settings, checking your firewall settings, and updating your QuickBooks software to the latest version. You can also try disabling your antivirus temporarily to see if it’s causing the error.
Answer: Once you’ve resolved QuickBooks error 15101, it’s recommended that you run a full system scan to ensure that your system is free from viruses or malware that could be affecting your software. Additionally, ensure that you regularly update your software and backup your financial data to prevent data loss in case of any unforeseen events.